- VMware Technology Network
- :
- Desktop Hypervisor
- :
- VMware Fusion
- :
- VMware Fusion Discussions
- :
- VMWare 11 / Mac Mini / Samsung X5 Thunderbolt 3 / ...
- Subscribe to RSS Feed
- Mark Topic as New
- Mark Topic as Read
- Float this Topic for Current User
- Bookmark
- Subscribe
- Mute
- Printer Friendly Page
- Mark as New
- Bookmark
- Subscribe
- Mute
- Subscribe to RSS Feed
- Permalink
- Report Inappropriate Content
I Have the above configuration. When I plug in the external thunderbolt drive it is not recognized by vmware. Is this a design/feature, a bug, or operator error. Any ideas?
Accepted Solutions
- Mark as New
- Bookmark
- Subscribe
- Mute
- Subscribe to RSS Feed
- Permalink
- Report Inappropriate Content
So looks like VMWare doesn’t support the mounting of Thunderbolt Drives.
This is from the VMWare FAQ found here:
Can I access Thunderbolt hard drives in Windows?
While Thunderbolt ports cannot be directly forwarded to Windows VM’s the same way that USB works, you can still access your Thunderbolt hard drives in VMware Fusion by mapping the hard drive to a VMware Shared Folder. Go to the Virtual Machine menu, select ‘Shared Folders’ and select ‘Add Shared Folder’. Select your Thunderbolt hard drive and click ‘Open’ to assign your Thunderbolt disk to the shared folder. To access your Thunderbolt hard drive in Windows, go to ‘VMware Shared Folders’ shortcut on the desktop and select your Thunderbolt hard disk.
---------------------------------------------------------------------------------------------------------
Was it helpful? Let us know by completing this short survey here.
- Mark as New
- Bookmark
- Subscribe
- Mute
- Subscribe to RSS Feed
- Permalink
- Report Inappropriate Content
The X5 requires the port to be Thunderbolt 3. It won't work with any else.
You didn't state the model/year of the Mac Mini but I am guessing it is not the latest.
I use the X5 with my 2019 Macbook Pro with no problems.
- Mark as New
- Bookmark
- Subscribe
- Mute
- Subscribe to RSS Feed
- Permalink
- Report Inappropriate Content
The drive works on the mac. It is as 2018 Mac Mini bought from Apple a couple of days ago. If I install a trial of Parallels, that software mounts the drive. So Parallels supports external Thunderbolt 3 drives, but it is looking like VMWare does not.
I wonder if you need VMWare Pro for Thunderbolt support.
Does VMWare follow these forums?
- Mark as New
- Bookmark
- Subscribe
- Mute
- Subscribe to RSS Feed
- Permalink
- Report Inappropriate Content
So looks like VMWare doesn’t support the mounting of Thunderbolt Drives.
This is from the VMWare FAQ found here:
Can I access Thunderbolt hard drives in Windows?
While Thunderbolt ports cannot be directly forwarded to Windows VM’s the same way that USB works, you can still access your Thunderbolt hard drives in VMware Fusion by mapping the hard drive to a VMware Shared Folder. Go to the Virtual Machine menu, select ‘Shared Folders’ and select ‘Add Shared Folder’. Select your Thunderbolt hard drive and click ‘Open’ to assign your Thunderbolt disk to the shared folder. To access your Thunderbolt hard drive in Windows, go to ‘VMware Shared Folders’ shortcut on the desktop and select your Thunderbolt hard disk.
---------------------------------------------------------------------------------------------------------
Was it helpful? Let us know by completing this short survey here.
- Mark as New
- Bookmark
- Subscribe
- Mute
- Subscribe to RSS Feed
- Permalink
- Report Inappropriate Content
Thank you for that information. That works but still we need to get access to my external thunderbolt 3 drive so we can install windows on it with a Mac OS Catalina.
The thunderbolt 3 port needs to be made available.
- Mark as New
- Bookmark
- Subscribe
- Mute
- Subscribe to RSS Feed
- Permalink
- Report Inappropriate Content
I'm having the same issue. I wanted to install MS Windows on the external TB3 drive.
- Mark as New
- Bookmark
- Subscribe
- Mute
- Subscribe to RSS Feed
- Permalink
- Report Inappropriate Content
If you're creating a new standalone VM, that works just fine. Just save the new image to the external drive (i.e. windows doesn't need to see the thunderbolt drive). The issue is attaching the actual drive itself to a virtual machine, which isn't supported.
- Mark as New
- Bookmark
- Subscribe
- Mute
- Subscribe to RSS Feed
- Permalink
- Report Inappropriate Content
I tried this and it works. However, the only problem here is that disk access will then hog up the thunderbolt bus if you need it for something else like 3D or audio. Mac Mini 2018 owners have two thunderbolt busses on their computers, but Fusion doesn't seem to be able to use one of them without hogging the other. Or maybe it is a Windows 10 problem. I ended up having my Windows 10.wmwarevm VMBundle on the internal SSD and everything works much smoother with applications that use devices attached to Thunderbolt.
- Mark as New
- Bookmark
- Subscribe
- Mute
- Subscribe to RSS Feed
- Permalink
- Report Inappropriate Content
Once the initial boot sequence is complete, and the disk activity settles down it should better, but yeah, if you can run it on a dedicated port, you're much better off.
- Mark as New
- Bookmark
- Subscribe
- Mute
- Subscribe to RSS Feed
- Permalink
- Report Inappropriate Content
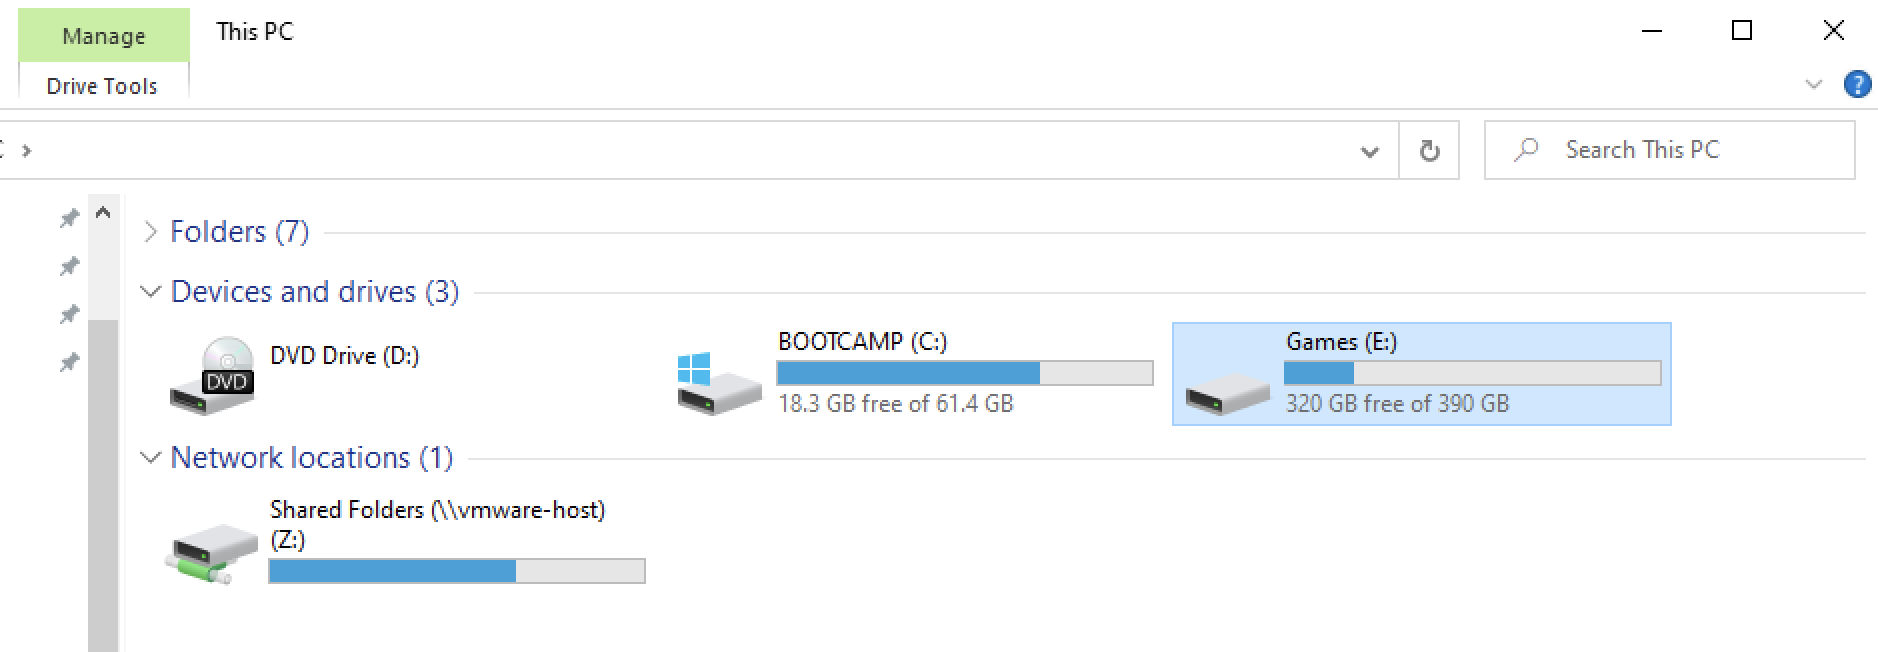
A better solution, if you truly want to 'attach' a physical external disk, to a Fusion VM (any O.S., not just windows) is to use the vmware-rawDiskCreator tool:
First, get details on the external thunderbolt disk:
In my case, I have an NTFS partition and an HFS+ partition, and I only want to share the NTFS partition with the Windows VM:
$ vmware-rawdiskCreator print disk2
Nr Start Size Type Id Sytem
-- ------ ---------- ---- -- -----------------------------
1 34 32734 GPT EE Microsoft Reserved
2 32768 819200000 GPT EE Basic Data
3 819232768 1134288896 GPT EE Apple HFS
Then create the Virtual Disk backed by the physical disk (using partitions or the whole disk, depending on your use case):
$ vmware-rawdiskCreator create /dev/disk2 2 games ide
$ ls -CF
Applications/ 'Boot Camp.vmdk' ' .... games-pt.vmdk ... games.vmdk ...
The size should match: 819200000
$ more games.vmdk
# ....
createType="partitionedDevice"
# Extent description
RW 34 FLAT "games-pt.vmdk" 0
RW 32734 ZERO
RW 819200000 FLAT "/dev/disk2s2" 0 partitionUUID @partition.....partMediaUUID=1A56C7B5-E572-43C9-AA7A-ECA3268CD673,partVolumeUUID=0C1C12D8-3E3A-41E0-B460-37CD379EC4AE
Confirm the UUIDs all match:
$ diskutil info disk2s2|grep -i uuid
Volume UUID: 0C1C12D8-3E3A-41E0-B460-37CD379EC4AE
Disk / Partition UUID: 1A56C7B5-E572-43C9-AA7A-ECA3268CD673
Backup and manually edit the vmx file:
$ diff Boot\ Camp.vmx ~
50,52d49
< sata0:2.deviceType = "rawDisk"
< sata0:2.fileName = "games.vmdk"
< sata0:2.present = "TRUE"
...
- Mark as New
- Bookmark
- Subscribe
- Mute
- Subscribe to RSS Feed
- Permalink
- Report Inappropriate Content
- Mark as New
- Bookmark
- Subscribe
- Mute
- Subscribe to RSS Feed
- Permalink
- Report Inappropriate Content
The one issue I noticed with this solution is that the file system for the shared folder is listed as HGFS on the Guest OS, instead of NTFS. Unfortunately, Dropbox isn't compatible with HGFS. You get the message, "Unsupported File System: To sync your Dropbox, move your Dropbox folder to a partition with a compatible File System. Dropbox is compatible with NTFS."
Host OS: Windows 10
Guest OS: Windows 10
- Mark as New
- Bookmark
- Subscribe
- Mute
- Subscribe to RSS Feed
- Permalink
- Report Inappropriate Content
Follow the instructions I posted for a physical raw disk.
FYI:
Parallels has no problem with Thunderbolt drives.